Since moving into my new studio, I've wanted to make a table that could function as a work table for terrain projects as well as a game table in my off time.
Having a sufficient table to play on is a problem many gamers face. Space, and cost are two of the greatest factors. I was able to build this table for around $50. That's a large chunk of change, but considering it's close to the cost of your average model kit, it's really not that far out in the grand scheme a hobbyist's budget. Put off that purchase of Terminators or Man-O-War for a month and you've got yourself a table that will serve you for years to come. In addition, I've designed it to easily break down for storage or transport.
Supplies
3 2x4 1/2-inch thick MDF panels
9 2x3 8' Studs
Box of 3" Screws
Box of 2" Screws
(Optional) 2x6 Lauan panel for bottom shelf
Tools
Jigsaw (I use a B&D 4.5 amp handheld jig saw.)
Cordless Drill with a 1/8" drill bit and phillips head attachments
Handheld Sander (I use a B&D Mouse detail sander)
Tape Measure
Rafter Square
Pencil
When working with power tools (or any tools, for that matter) always read the instructions, follow all safety precautions, and wear the recommended safety equipment like a dust mask and protective eyewear.
Construction
First off, shop around for the lumber. Depending on what DIY stores you have in your area, you can probably find something on sale. Lowes and Home Depot had some vastly differing prices in my area. At the Depot, I was able to find the studs for 1.89 per piece. Check the wood for warping, splits, and odd knots that will interfere with the construction. Also, for those of you who may not be carpentry-savvy– 2x3 studs are not actually 2-inches by 3-inches. They're 1.5 x 2.5, so don't forget to factor that into your measurements. The MDF boards are a little long: They're 4'1'' long, and 2' wide.
Step 1) Begin by cutting the top table frame. The jig saw works best for this. Cut two long sides to 6' and six center pieces to 3'10" (only 4 center pieces are shown in the picture; the other two will be for the lower leg supports). The total table width will be 4'1." I made the adjustments so the MDF panels would be flush with the edge of the table frame, rather than overhanging the edge.
Step 2) Cut 4 table legs. The length of the legs doesn't affect the rest of the assembly so you can taylor them to your personal preference (and chair limitations). The average household table is around 2'6" high which can be a little low for a game table (especially if you're tall). I made my table legs 3 feet long, which will be a little higher. I've also got a drafting chair and some 2-foot high stools that will allow me to sit comfortably when working or gaming.
Here you can see the legs laid out with the top end and the bottom leg support in place.
Step 3) Sand the pieces before assembly. This is where I used the Mouse sander, just to remove any rough spots or splinters on the cut ends. I also sanded off the factory markings so the boards will have a clean appearance.
Here's where the rafter square comes in handy to make sure your corners are square. The MDF boards corners and edges can also be used as a squaring guide.
Step 4) Attach the legs and end supports. Measure 12" up from the bottom to attach the lower support. Drill guide holes with the 1/8" bit, and use two 3-inch screws at each join. Make sure the screws at the top are fairly centered because next you will be drilling in from the sides above and below and you don't want to hit this set of screws.
Step 5) Drill four holes into the ends of the 6-foot sides of the table frame. Space the holes so they will line up with the two beams that make up the leg ends. (Those small blocks represent the leg assembly, with the red lines indicating the spacing.) Make sure the four holes are evenly spaced, and separated enough to go above and below the screws in the leg end.
Step 6) Place the legs upside down and align the side beams. Drill through the guide hole into the leg, and then insert two screws. (Leave the bottom row alone for now.)
Step 7) Once all four corners are attached, flip the table upright and attach the final screws. In this image, you can see how the side screws fit around the end screws.
Step 8) Measure 11" in from the ends for the support beams (and optional shelf) underneath.
The support beams are important for extra stability, and by adding a piece of lightweight lauan, they can be turned into a shelf for storing terrain, supplies, and such. Lauan comes in 4x8 sheets, so you'll need to get it cut down to 2x6. They also sell 2x4 sheets of lauan which are a little cheaper, but will leave you with 1-foot gaps at the ends. The shelf will add $8-10 to the cost, and I've held off for now, but built the table with the intention of adding the shelf later.
Why lauan? It's cheap, thin, and lightweight. I used 1/2" MDF for the top so the table will be sturdy, but the bottom shelf doesn't need to support that much weight. However, you could certainly use a thicker wood if you like.
Step 9) Trim the shelf supports to 5'9" (69") and attach them as shown. They should be spaced so their outer edges are 2 feet apart. You could make the shelf wider if you wish, but wanted it recessed in so I could comfortably sit with my legs under the table while I work.
With the table frame finished, its time to attach the top. I found that I had a slight overhang on the ends, about 3/16 on each end, so I shifted the MDF panels a little so it would be equal on each end.
Step 10) Align the pieces of MDF on top, drill guide holes and attach them with the 2" screws. To avoid all the screws on the corner, set the screw 5" in from the side, and 1" from the edge.
Attach one end first, with two screws on the table end, and then add a screw on the inner edge, 2" from where the panel seams will be, and 3/4" from the side edge of the table.
As you're attaching the top panels, it may be necessary to tork the table frame into shape. I found that as I worked, the frame wasn't quite square, off by about 1/2-inch. This just meant that I needed to press the side beam in a little as I drilled for the screw. Once the top panels were secure, they held the table nice and square.
The MDF provides a nice solid surface, but it needs support to keep the seams from separating and sagging.
Step 11) Turn the table on its side and lay in the remaining center pieces you cut in the first step. Attaching them now avoids having to precisely measure where they need to sit so the MDF seams lie directly over them.
Lay them flat, centered over the MDF seam and drill into the ends. Attach them with the 3" screws. Flip the table and repeat this for the opposite side.
Step 12) With the center supports in place, drill and add the final 2" screws along the seams. Each screw should be 18" from the table side, and 3/4" away from the seam. I've kept the screws to a minimum to make for easy table disassembly. If your table will be in a permanent location, you can obviously add more.
With the exception of the lauan for the lower shelf, the table is finished!
If you take the table apart, be sure to label the parts and attachment points so all the screw holes will line up properly.
Here's the table broken down into 11 pieces. The end leg assemblies can stay together, and if the shelf was in place, I'd leave the lauan sheet attached to the 69" support beams, making only 10 pieces in total. All this fits into my Honda's trunk with the seats folded down!
And now back to work!
'Til next time!
I've been working on this guy on and off for the past few weeks, but at long last, the newest version Marduk is finished.
I plan to field this model as a 'Strigoi Ghoul King' even though the Strigoi and Blood Dragon are separate vampiric bloodlines. Marduk's ferocity and feral nature has completely overtaken the martial discipline of his Blood Dragon order, and he is more at home with the creatures of the night– ghouls, dire wolves, bats.
Here's a little insight into the modeling process:
I wanted Marduk standing atop a shredded corpse, drenched in blood releasing a primal scream. The body on the base is clipped from the charnel pile on the Corpse Cart. I modeled the ground texture with Brown Stuff modeling putty, and added a few metal skulls to prop up the torso and add some detail.
The entrails and torn flesh were then sculpted. In this image, the sculpting is finished and the base has been sprayed with black primer. The base and figure were painted separately so I could get at all of the details.
Marduk himself is built from the Ghoul King that comes with the Terrorgheist kit. I removed the "dog legs" and replaced them with metal feet from a classic GW ghoul. The legs are pinned in place and the shins, sculpted with putty.
In this shot you can see the model closest to its original state, the dog legs, arms with long taloned fingers, the metal ghoul that marduk's feet came from, and the corpse pile.
In this pose, he's rearing up; perfect for the primal scream.
Unfortunately, the heaping wolf cloak I was planning to add wouldn't sit on his back with him leaning that far back. I cut the model at the chest and angled him forward. Marduk also needed to carry his trademark headsman's axe, so I had to swap out his hands for ones that looked like they could actually hold a weapon. These came from the Crypt Ghast in the plastic ghoul kit. All the detail at the joins was resculpted, as was the axe handle. The axe head was cut from Grimgore Ironhide's axe, heavily trimmed and reshaped.
That plastic end cap on the axe handle came from the handle of a plastic skeleton mace.
The final sculpting step was to add the cloak. With the exception of the wolf feet, which came from the old Space Wolves accessory sprue, it's all putty. To accommodate the cloak, those spines on the back of Marduk's arms had to go as well.
I'll close out with a couple of detail shots. My only regret was not photographing the painted base before I glued Marduk to it. But, hey, I was on a roll!
'Til next time!
I think October is going to be, fittingly, the month of the wolf. Up first, the evolution of my dire wolf units, and a quick modeling guide for my Doom Wolves.
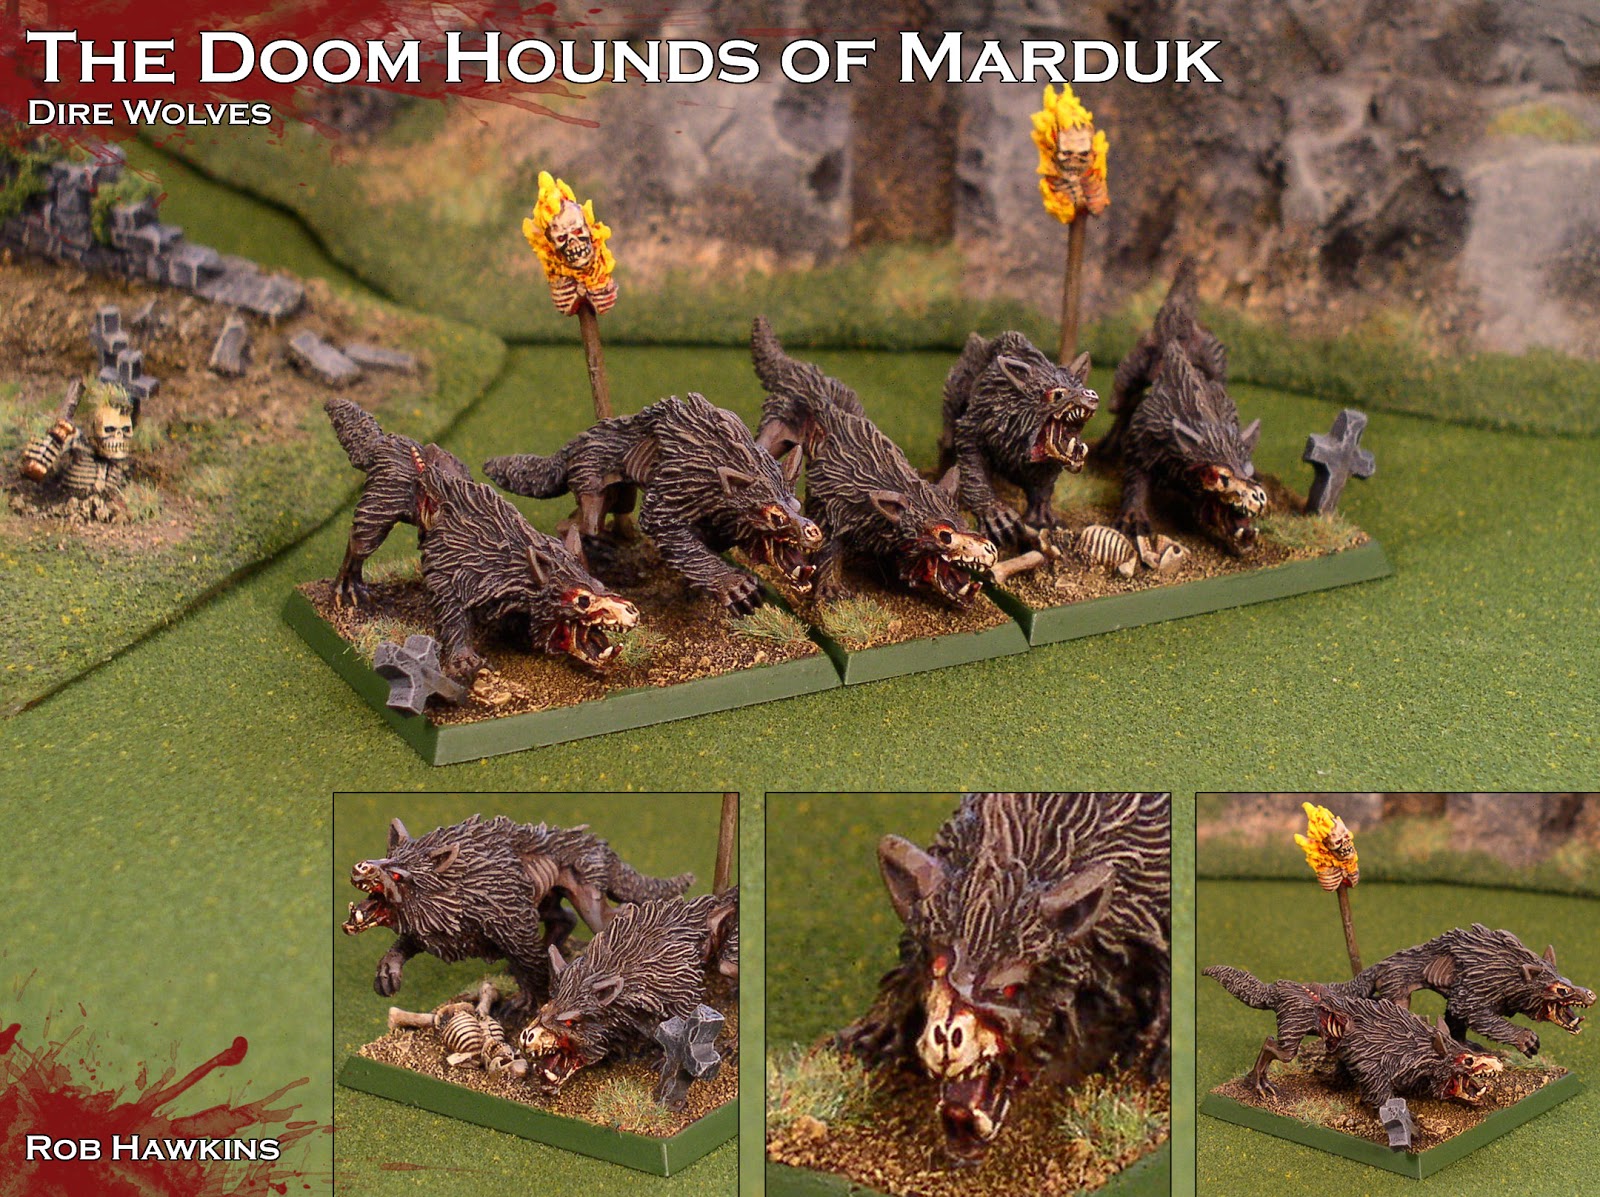
The Doom Hounds of Marduk
On the fringes of the Legion of the Infernal Skull's battle line, dire wolves slather and howl as they tear across the battlefield. These feral hounds are the "pets" of one maddened vampire– Marduk "the Wolf" Von Koss. The brutal killer has fought alongside the beasts, charging into the fray on horseback or even on foot with an unnatural, lupine speed.
This unit represents my "classic" dire wolves, with the original Marduk riding alongside. It includes the old metal doom wolf model but, prior to that model's release, the unit leader was represented by the wolf with a bone in its mouth.
Evolution of the Wolf
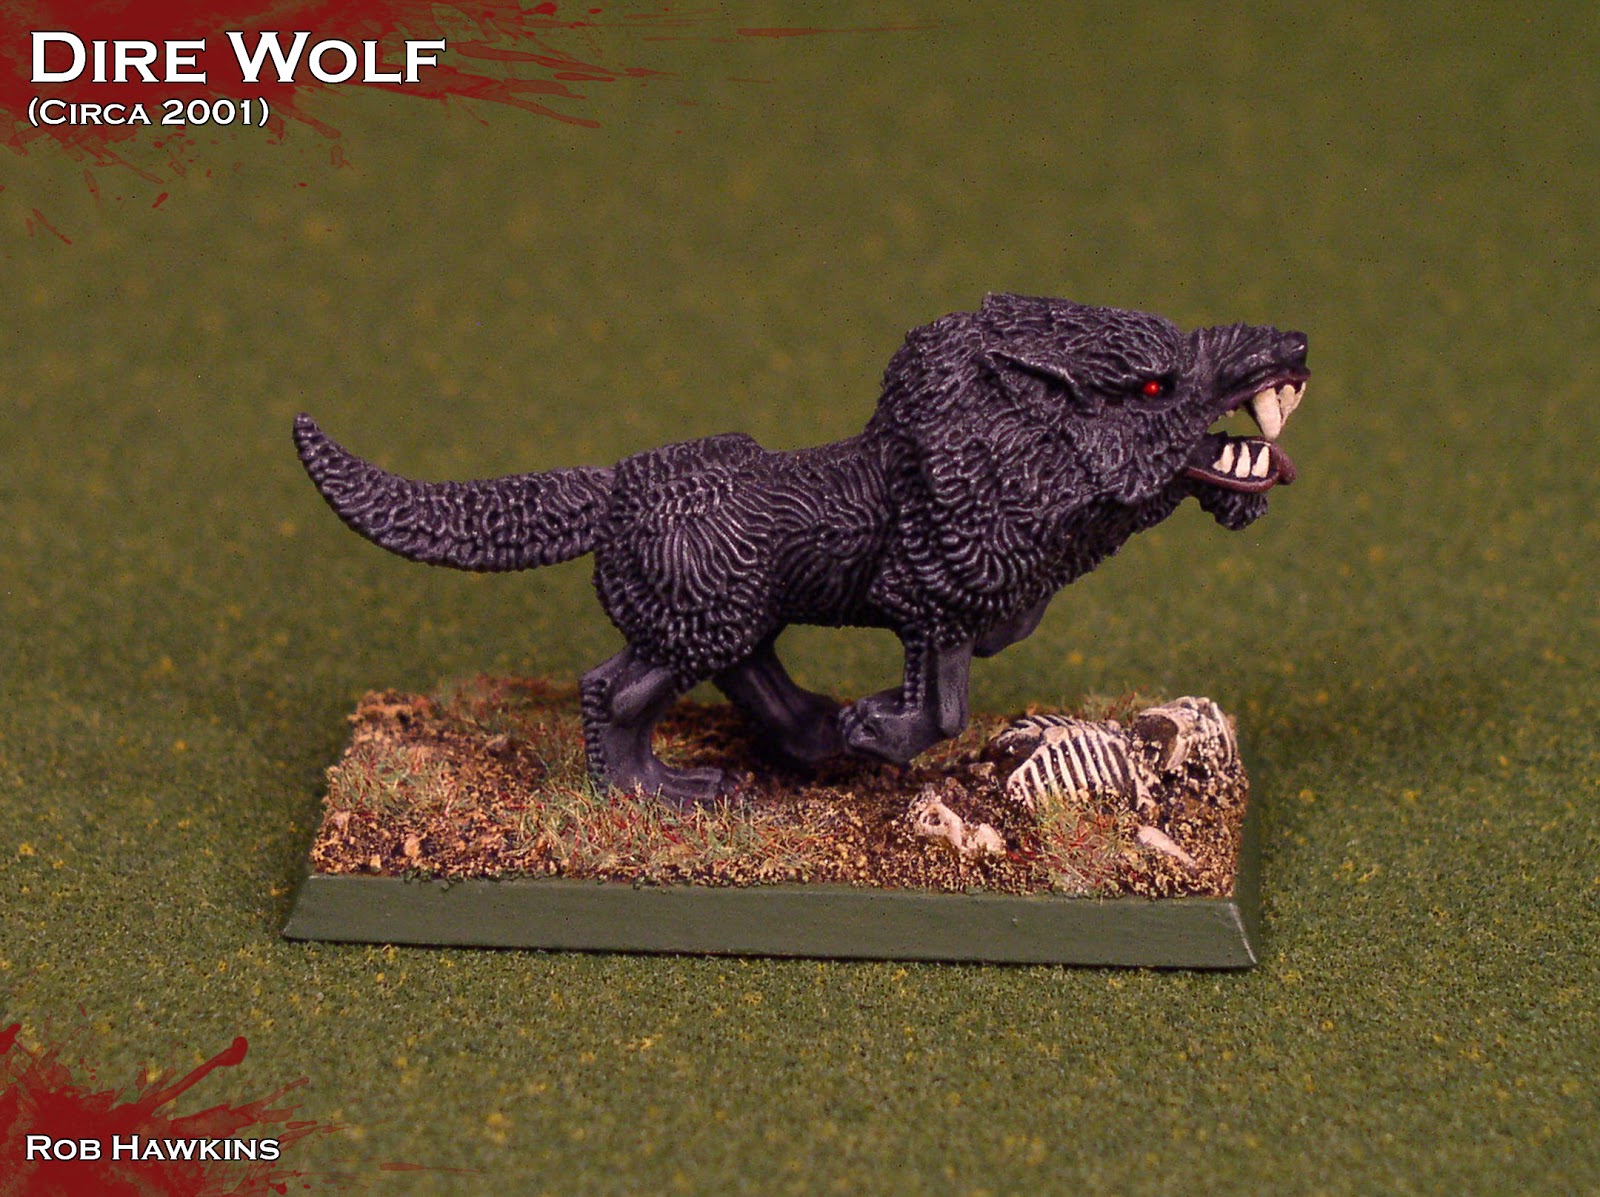
Dire Wolves were in the first incarnation of the Vampire Counts army book, back in 1999. At the time, there weren't any official dire wolf models, so I made due with the "regular" GW wolves, typically used as goblin wolf rider mounts. People used to ask how they could make dire wolves, and I'd joke, "Just get regular wolves and paint them to look evil."
Eventually, "proper" dire wolf models were released. These used the same plastic wolf body and a metal head with significantly larger teeth. I picked up a few of these to fill out my wolf unit.
As my modeling skill improved, I started adding elements like tombstones and skeletons to the bases. I also realized that I needed to putty the seam along the wolf's neck. This next version is what I thought would be the "final" version of my wolves. I planned to eventually revisit the older models and sculpt fur over their neck seams.
Before getting too far into that project, the new (at that time) Chaos hounds were released. These were some of the nicest "hound" models ever produced, almost custom tailored to be converted into dire wolves! They had exposed skulls and a few even had some ribs poking out. With a little modeling, they became my new Doom Hounds of Marduk.
Backing up a couple years, the dire wolf unit leader (called a doom wolf) underwent a similar evolution. At first, there was no official model, so I represented the doom wolf with a converted "regular" wolf.
Before long, GW produced a metal doom wolf model. It was suitably larger, with exposed bone.
When I settled on the Chaos hound-converted wolves, they went without a doom wolf for almost a decade. The old model just didn't cut it compared to my new conversions. Finally, this year GW released the Thunderwolves and Fenrisian Wolves for 40K. The Fenrisian Wolves are a little small (I'll discuss them in the dire wolf tutorial), but the Thunderwolves are perfect! A little putty to replace the 40K tech bits with undead details, and I've got a doom wolf suitable to lead the Doom Hounds of Marduk into battle!
Converting the Doom Wolf
This conversion uses the "B" Thunderwolf model, but the others work just as well. I began by cleaning the mold lines and super gluing the body, legs and paws together. With my hobby knife (a dremel or clippers would work as well), I cut away all of the techy details, and started adding modeling putty to conceal the seams where the parts join together.
The saddle strap, in particular, needed to be removed and I took this opportunity to gouge a divot in the model's side and sculpt some innards, ribs, and hanging flesh.
Once the inner layer of putty dried, I sculpted the fur around the outside of the wound.
The rest of the seams were concealed with sculpted fur, taking care to match the stylized pattern of fur around the putty work.
For the head, I used Logan Grimnar's wolf skull, and placed it into a cutout on the plastic head. There's also a small tear in the wolf's mouth that I added with my hobby knife.
The fur and torn flesh was sculpted around the eye socket and built up to add more texture to the flat areas.
With the sculpting complete, the wolf was added to its base. Because the wolf is so long, I glued the feet as far back as possible and added some putty to angle the model upward. Now he'll tower over the enemy models in front of him rather than colliding with them.
A little paint, and he's ready to take his place as the alpha of the pack!
Coming up, I'll give a full tutorial on the conversion and painting of the dire wolves themselves, and we'll see that new Marduk model I've been teasing on Facebook and the Carpe Noctum Vampire Counts forum.
'Til next time!